


Hey! Heylow!

Thanks for stopping in.
This would be my first post in my Linux series and your definitely in for a treat.
I recently got the raw files to some photoshop designs my friend made for me. I was super happy to have them but snap! I am on Linux! How do I get to install Photoshop here?
Questions always breed answers😎.
Well, yes I got the answers to my questions and that I would be sharing with you.
Just a note, it's not so difficult.
What you should have
- Good internet access.
- Photoshop Raw installer.
- Patience😉.
Abbreviations used in this post
- OS (Operating System)
- dpkg (Debian Package Manager)
- apt (Advanced Package Tool)
- GUI (Graphical User Interface)
As may know, there are things called emulators that help you run programs not primarily made for your OS (Examples are Bluestack and Nox for windows). Well, also there are other softwares that act more like an abstraction or Compatibility layer instead of an emulator.
They help you run software made for other OS on your primary OS in a layer rather than a full-blown container like the emulators do which unnecessarily takes up your system memory and causes your machine to lag.
In this post, we would be achieving our aim using software that acts as a compatibility layer called Wine.
Wine stands for "Wine is not an Emulator" (This is one of those names that got me thinking hilariously since I started my journey with Linux😂).
Heads up! Not all windows software works well with wine but for the most part, it handles photoshop well enough. I am also on Kali Linux but I think it should be the same process for other Linux Distributions.
Enough of the talks, Let's dive straight into this.
Drum rolls 🥁. (Tada da da daaaaa!)
1. Enable 32 bits architecture.
First, Wine needs us to enable 32 bits architecture on our machine just so we give Wine the flexibility to handle Windows applications or in our case Photoshop, properly.
Well, the chances that this has been done on your machine before now is really slim but not to worry, if this has been enabled before, the terminal would alert you.
We would be using dpkg for this, which is a Package Manager for debian Machines.
To enable the required architecture, Type the commands below in your terminal.
sudo dpkg --add-architecture i386
Tada! The 32 bits architecture has been added (no sweat).
Just to be sure we weren't scammed 😉.
Type in the command below into the terminal.
dpkg --print-foreign-architecture
The output should say something like
i385
If you got this output. Congratulations. We have finished this process successfully.
If this wasn't the case for you please drop a comment so I could help you out.
A restart would do us some good now.
2. Update all Kali Linux packages.
For us to be on the safer side while making our installations, update your packages by running the command below in your terminal.
sudo apt update
sudo apt upgrade
This might take a little time depending on when last you updated your packages.
3. Add wine to the repository and Install Wine.
Next, we have to add wine to our repository.
You can do this by running each of the commands below.
The command below installs some necessary packages, using wget to get necessary key info and then sets the key with an update at the end.
sudo apt install software-properties-common wget -y
wget -O- -q https://download.opensuse.org/repositories/Emulators:/Wine:/Debian/Debian_10/Release.key | sudo apt-key add -
sudo apt update
Yeah! Now we are ready to install wine itself.
While making my installations, I had to change something in my sources.list file in the /etc/apt folder.
According to wine instructions, I had to add the following to my sources.list folder.
deb https://dl.winehq.org/wine-builds/debian/ bookworm main
This is specifically for Debian testing distributions. You might not have to do this in your own case, this is just what I had to do for mine to work.
Once you are done with that, type the command below into your terminal
sudo apt install --install-recommends winehq-stable
Again, while installing, I was not able to get mine from the stable branch. I had to use the development branch, which can be gotten with the command below.
sudo apt install --install-recommends winehq-devel
4. Install PlayOnLinux
Now, to the last weight lifting. We need to install Playonlinux.
According to their website.
PlayOnLinux is a piece of software that allows you to easily install and use numerous games and apps designed to run with Microsoft® Windows®. Few games are compatible with GNU/Linux at the moment and it certainly is a factor preventing the migration to this system. PlayOnLinux brings a cost-free, accessible and efficient solution to this problem.
To install PlayOnLinux all we have to do is install it using apt with command below
sudo apt install playonlinux
The above is one way to do it and if it does not work well for you , you can try installing it with the commands below using apt-get.
wget -q "http://deb.playonlinux.com/public.gpg" -O- | apt-key add -
wget http://deb.playonlinux.com/playonlinux_stretch.list -O /etc/apt/sources.list.d/playonlinux.list
sudo apt-get update
sudo apt-get install playonlinux
Once that has been done, you are good to go.
5. Install Photoshop
Now we have Wine and PlayOnLinux installed, we can go ahead to install photoshop.
Yeah!
Open PlayOnLinux either from your GUI or your terminal. You can do this in the terminal by typing
playonlinux
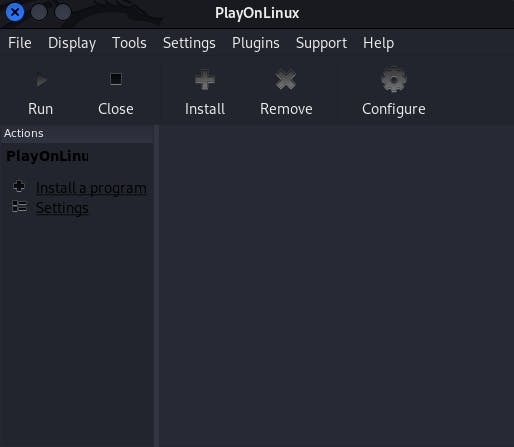
This is what PlayOnLinux looks like this.
Once you are on the PlayOnLinux app, click on the install a program link which would take you to the list of apps recommended to be used on PlayOnLinux.
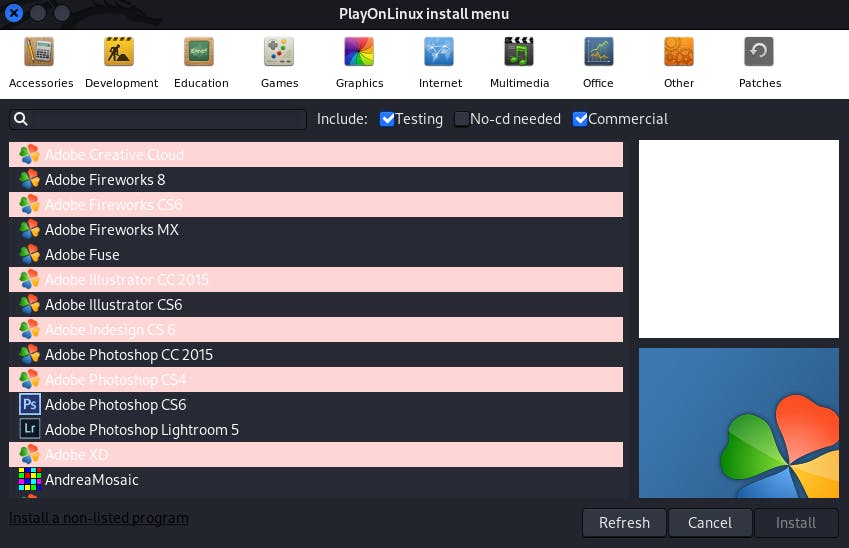
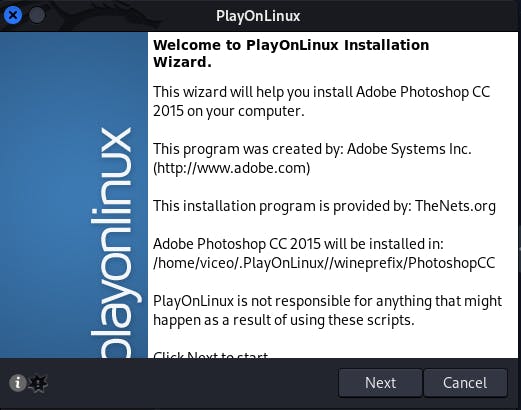
Proceed by selecting graphics in the category list, choose Adobe photoshop on the list and continue. You would have to accept their terms to continue. After that, the installation wizard would come up which looks like this.
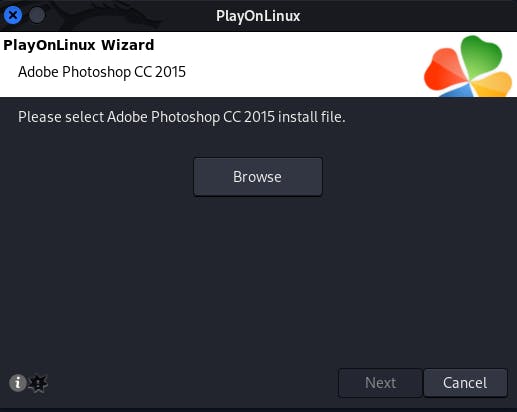
Click next to continue and then browse for your Photoshop installer.
Then click continue to finish up and there you go. You now have Photoshop installed on your Linux. You can go ahead to try installing other windows apps to get your hands dirty.
Wow! You read on to this point? You are amazing. If you found this valuable, kindly like this post and also share. You can follow me on my social media as well to get more updates when I post up new things.
See you later😎.